The following command list all the keyboard shortcuts under this category.
gconftool-2 --recursive-list /desktop/gnome
More options go to: http://www.gnome.org/learn/admin-guide/2.2/ch01s04.html
Wednesday, 30 January 2008
keyboard shortcut reset
quote in Java
- "3" is not a char literal. It uses double quotes, instead of single quotes. (Double quotes makes it a String which we'll discuss later).
'' is not a char literal. There isn't a character between the two single quotes. You need one character between the double quotes.
'ab' is not a char literal. There are two characters in between the single quotes. char literals only have one character in between.
Saturday, 26 January 2008
python workspace, a little bit global
a=100
def first():
b=a+1
c=a+2
return b,c
def second():
d=bb+11
e=cc+12
return d,e
class thirdC:
def fourth(self):
f=dd+101
g=ee+102
return f,g
def fifth():
h=ff+1001
i=gg+1002
(j,k)=second()
return h,i,j,k
if __name__=='__main__':
(bb,cc)=first()
(dd,ee)=second()
tc=thirdC()
(ff,gg)=tc.fourth()
(hh,ii,jj,kk)=fifth()
Friday, 25 January 2008
java Socket programming
DataInputStream和InputStreamReader都可以用一个InputStream类做为其参数,而且目的也是一样的,就是把字节级的读取转换为字符级的读取!
#### Basing on Byte stream
Socket Operations at Client Side
• create a client socket:
Socket (host, port)
s = new Socket (“java.sun.com”, 13)
• get input / output data streams out of the socket:
in = new DataInputStream(s.getInputStream ());
out = new DataOutputStream( s.getOutputStream());
out = new PrintStream( s.getOutputStream());
• read from input / write to output data streams:
String str = in.readLine();
out.println ( “Echo:” + str + “\r”);
• close the socket:
s.close();
Socket Operations at Server Side
A server is always waiting for being connected. It need not initiate a connection to a host. So a server socket need only specify its own port no.
• create a server socket:
ServerSocket (port)
ServerSocket s = new ServerSocket(8189);
• accept an incoming connection:
Socket snew = s.accept ();
• get input / output data streams out of the socket for the incoming client:
in = new DataInputStream(snew.getInputStream());
out = new PrintStream(snew.getOutputStream());
• close the socket for the incoming client:
snew.close();
#### Basing on Character strem
Socket Operations at Client Side
• create a client socket:
Socket echoSocket = new Socket(args[0],9999);
out = new PrintWriter(echoSocket.getOutputStream(),true);
in = new BufferedReader(new InputStreamReader(echoSocket.getInputStream()));
• read from input streams:
System.out.println("server: " + in.readLine());
• write to output streams:
String str = in.readLine();
out.println ( “Echo:” + str + “\r”);
• close the socket
echoSocket.close();
Socket Operations at Server Side
• create a client socket:
ServerSocket serviceSocket = new ServerSocket(9999);
r=new InputStreamReader(serviceSocket.getInputStream());
in=new BufferedReader(r);
out = new PrintWriter(serviceSocket.getOutputStream(),true);
• read from input streams:
String line=in.readLine()
System.out.println("Received from client "+line);
• write to output streams:
String str = in.readLine();
out.println("Server says: "+str);
• close the socket
serviceSocket.close();
Powered by ScribeFire.
Wednesday, 23 January 2008
HOWTO: listbox in Python Tkinter
alist=[' x ',' xin ','zhengxin',' shan ',' shanshan ','shanshan cheng ']
##aset=set(alist)
##b=set()
##
##for aitem in aset:
## if aitem.find('xi')!=-1:
## print aitem,':item will be removed'
## b.add(aitem)
##
##c=aset-b
##print aset
##print c
from Tkinter import *
class MyDialog:
def __init__(self,master):
MyDialog.removed=list()
Label(text="one").pack()
self.s = Frame()
self.s.pack()
self.listbox = Listbox(self.s,selectmode=EXTENDED)
self.listbox.pack()
for item in alist:
self.listbox.insert(END, item)
Label(text="two").pack()
self.b = Button(master, text="Delete",command = self.toremove)
## self.b = Button(master, text="Delete",command = lambda lb=lb: lb.delete(ANCHOR))
self.b.pack()
def toremove(self):
# Select what to remove and save them to the Class Variable MyDialog.removed
self.items = self.listbox.curselection()
for i in self.items:
MyDialog.removed.append(self.listbox.get(i))
print self.listbox.get(i)
# To sort the sequence,then reverse, then delete.
self.iitems=list()
for i in range(len(self.items)):
self.iitems.append(int(self.items[i]))
self.iitems.sort()
self.iitems.reverse()
for j in self.iitems:
self.listbox.delete(j)
## def toremove(self):
## self.listbox.delete(ANCHOR)
if __name__=='__main__':
root = Tk()
d = MyDialog(root)
root.mainloop()
HOWTO: lambda in Python
By popular demand, a few features commonly found in functional programming languages like Lisp have been added to Python. With the lambda keyword, small anonymous functions can be created. Here's a function that returns the sum of its two arguments: "lambda a, b: a+b". Lambda forms can be used wherever function objects are required. They are syntactically restricted to a single expression. Semantically, they are just syntactic sugar for a normal function definition. Like nested function definitions, lambda forms can reference variables from the containing scope:
>>> def make_incrementor(n):
... return lambda x: x + n
...
>>> f = make_incrementor(42)
>>> f(0)
42
>>> f(1)
43
lambda很灵活,可以用在任何需要函数的地方:
>>>def f(x):
… return x*2
…
>>> f(2)
4
定义一个函数f(x),f(x)=x*2. 用lambda来表达就是:
>>> f=lambda x: x*2
>>> f(2)
4
这个函数没有函数名,lambda的结果被赋值给变量f调用。
############################################
对于Tkinter,
可以直接用lambda直接设置一些简单callback:
b = Button(master, text="Delete",command = lambda listbox=listbox: listbox.delete(ANCHOR))
在这种情况下,需要设定返回值(listbox=),然后才是lambda的参数(listbox).
这种简写方式等效于:(如下code是在一个class内的代码)
self.b = Button(master, text="Delete",command = self.toremove)
##self.b = Button(master, text="Delete",command = lambda llb=lb: lb.delete(ANCHOR))
def toremove(self):
self.listbox.delete(ANCHOR)
Powered by ScribeFire.
Tuesday, 22 January 2008
Create class for GUI , Python
from Tkinter import *
class MyDialog:
def __init__(self, top):
Label(top, text="Value").pack()
self.e = Entry(top)
self.e.pack(padx=5)
b = Button(top, text="OK", command=self.ok)
b.pack(pady=5)
def ok(self):
print "value is", self.e.get()
root = Tk()
d = MyDialog(root)
root.mainloop()
Multiline Formulae in LaTeX and lyx
Cited from: http://www.maths.tcd.ie/~dwilkins/LaTeXPrimer/Multiline.html
Consider the problem of typesetting the formula
It is necessary to ensure that the = signs are aligned with one another. In LaTeX, such a formula is typeset using the![[GIF Image]](http://www.maths.tcd.ie/%7Edwilkins/LaTeXPrimer/EX_cosdoub.gif)
eqnarray* environment. The above example was obtained by typing the lines \begin{eqnarray*}
\cos 2\theta & = & \cos^2 \theta - \sin^2 \theta \\
& = & 2 \cos^2 \theta - 1.
\end{eqnarray*}
Note the use of the special character & as an alignment tab. When the formula is typeset, the part of the second line of the formula beginning with an occurrence of & will be placed immediately beneath that part of the first line of the formula which begins with the corresponding occurrence of &. Also \\ is used to separate the lines of the formula. Although we have placed corresponding occurrences of & beneath one another in the above example, it is not necessary to do this in the input file. It was done in the above example merely to improve the appearance (and readability) of the input file.
The more complicated example
was obtained by typing![[GIF Image]](http://www.maths.tcd.ie/%7Edwilkins/LaTeXPrimer/EX_eqnarray.gif)
If $h \leq \frac{1}{2} |\zeta - z|$ then
\[ |\zeta - z - h| \geq \frac{1}{2} |\zeta - z|\]
and hence
\begin{eqnarray*}
\left| \frac{1}{\zeta - z - h} - \frac{1}{\zeta - z} \right|
& = & \left|
\frac{(\zeta - z) - (\zeta - z - h)}{(\zeta - z - h)(\zeta - z)}
\right| \\  & = &
\left| \frac{h}{(\zeta - z - h)(\zeta - z)} \right| \\
 & \leq & \frac{2 |h|}{|\zeta - z|^2}.
\end{eqnarray*}
The asterisk in eqnarray* is put there to suppress the automatic equation numbering produced by LaTeX. If you wish for an automatically numbered multiline formula, you should use \begin{eqnarray} and \end{eqnarray}.
#############################################
For Lyx, in the menu of Insert > Math >
Eqnarray Environment, here it's easy to input multiple-line equation.
Lyx: equation numbering ALT+M N
LATEX is at its best when handling mathematical equations. Using LyX, you can get those perfect
equations with relatively little effort. There are two ways of entering equations. The first is to
use the menus. The “math” submenu in the “insert” menu contains everything you need. The
only problem is that it is clumsy, and only suitable for very beginning users. Far better is to
use the keyboard. The Alt-m key sequence gives you pretty much everything you need to create
equations. Let us try to create the following equation:
1. First enter the “Descriptive Math Mode” by pressing Alt-m d which starts an equation on
a separate line.
2. The terms on the left side involve fractions. A fraction is entered by typing Alt-m f (“f”
for fraction). To enter the ¶ symbol, type Alt-m p (“p” for partial). So type
Alt-m d Alt-m f Alt-m p A
The
and allows you to enter the next term.
3. The second term involves a subscript. This is done by typing “_”. So the second term is
entered as:
+ v_G Alt-m f Alt-m p A
5
The “v_G” entry creates vG.
entered as follows:
+ iD Alt-m f Alt-m p^2 A
Notice the “Alt-m p^2” and the “t^2” entries. These create the second derivitives.
5. The term on the right involves a Greek letter and vertical bars. These are entered as follows:
= Alt-m g g |A|^2 A
Here the “Alt-m g” sequence selects the Greek keyboard, where “abcde. . . ” become
“abcde. . . ”. The vertical bar is just directly typed in as seen above.
6. Finally, we want to give the equation a num
If you want to add a number to an equation, just put the cursor into the equation
and type Alt-m n. The equation number is automatically generated, and is guaranteed to be
in proper sequence, with proper respect paid to style. If you want to remove an equation
number, just type Alt-m Shift-n.
However, the only real reason to number an equation such as Eq. (1) is to refer to it in the
text. In that case, we can’t just add a number, we have to give that number a meaningful
up a dialog box where you can give the name of the label, say “eq:maineq” (by default,
LyX will put “eq:” as part of an equation label to keep it from being confused with a
section label or a figure label or any other labe
to that equation elsewhere by typing
Eq. Alt-i r and selecting “eq:maineq”
That is pretty much it. There is much more you can do, like creating matrices, integral signs etc.
But the essence of the math mode in LyX is what we just did. But look at the result (type Alt-x
p) and see the quality of the typesetting that we have painlessly obtained. The Alt-m keyboard is
summarized below for quick reference:
Normally, equation with label will be numbered automatically.

Python Tkinter-Checkbutton
Cited from: http://effbot.org/tkinterbook/checkbutton.htm
To use a Checkbutton, you must create a Tkinter variable. To inspect the button state, query the variable.
from Tkinter import *

master = Tk()

var = IntVar()

c = Checkbutton(master, text="Expand", variable=var)
c.pack()

mainloop()
By default, the variable is set to 1 if the button is selected, and 0 otherwise. You can change these values using the onvalue and offvalue options. The variable doesn’t have to be an integer variable:
    var = StringVar()
   c = Checkbutton(
       master, text="Color image", variable=var,
       onvalue="RGB", offvalue="L"
       )
If you need to keep track of both the variable and the widget, you can simplify your code somewhat by attaching the variable to the widget reference object.
    v = IntVar()
   c = Checkbutton(master, text="Don't show this again", variable=v)
   c.var = v
If your Tkinter code is already placed in a class (as it should be), it is probably cleaner to store the variable in an attribute, and use a bound method as callback:
    def __init__(self, master):
       self.var = IntVar()
       c = Checkbutton(
           master, text="Enable Tab",
           variable=self.var,
           command=self.cb)
       c.pack()

   def cb(self, event):
       print "variable is", self.var.get()

Example:

from Tkinter import *

def cb1():
   print 'use c.var.get() to check the checkbutton value'

master=Tk()
v = IntVar()
c = Checkbutton(master, text="Color Image", variable=v, command=cb1)
c.var=v
c.pack()
master.mainloop()
Saturday, 19 January 2008
simple python gui
from Tkinter import *
root = Tk()
w = Label(root, text="Hello, world!")
w.pack()
root.mainloop() # if runs in IDLE, comment this line, otherwise errors occur.
Friday, 18 January 2008
希望入英籍的朋友要严重关注的问题
关于双重国籍的问题, 很多朋友都要各种各样的疑问. 根据英国的制度, 在加入了英国国籍以后, 而你的中国护照又有效的话, 确实是可以保留两本护照的. 关于中国那边的法律在次不再赘述了, 我先来解释一下英国的制度对于这种双重国籍的便利. 英国法律允许双重国籍, 这自然是不消说了, 而很多朋友得以保留中国护照同时使用的原因, 主要是英国没有绿卡制度, 英国的'绿卡', 其实就是一个永久有效的签证'INDEFINATE LEAVE TO REMAIN', 根据以往的经验, 一般在取得了永久居留的签证以后, 下一步就是入籍, 而即使你成功加入了英国国籍, 这个在中国护照上的签证依然是有效的.而我们知道;, 要在加入了其他国籍之后, 保留中国护照的最大技术上的难度就是, 因为绿卡取消导致中国的出境困难. 在这里我来举一个例子来解释一下, 以便大家更好的理解这个CASE. 以加拿大为例, 申请永久居留其实就是申请'枫叶卡', 类似美国的绿卡制度, 而'枫叶卡'持有者申请了加拿大国籍之后, 这个'枫叶卡'就会被取消. 如果一个加拿大华人期望能够同时保留中国护照, 问题就来了, 假如他持中国护照入境中国, 出境的时候就会有麻烦, 因为他的'枫叶卡'被取消了, 所以他的中国护照上也就没有其他国家的签证了, 这样中国的海关是不会准许他出境的. 如果在英国, 就没有类似的麻烦, 即使你入籍了, 中国护照上还有那个证'INDEFINATE LEAVE TO REMAIN'签证, 这样你只要在出入中国口岸的时候单一使用中国护照就可以了. 但是目前, 有一个细微的变化, 很可能会对持有两本护照的朋友造成很大困扰, 虽然目前我还不能证实, 但确实是一个值得关注的问题.
'
英国除了'INDEFINATE LEAVE TO REMAIN', 还有一个签证叫做' certificate of entitlement to right of abode', 准确来说, 这个不是一个签证, 而只能称为'签注', 申请这个的人, 主要是拥有英国居留权, 但又没有英国护照的人士. 顾名思义, 这是英国居留权签注,本质上和ILR永久居留签证是不同的. 但是,在HOME OFFICE的网页上宣布, If you have a certificate that was issued after 21 December 2006, it can be withdrawn if we find out that you no longer qualify for one or if an official order is made to remove your right of abode. 也就是说, 任何人在06年12月21号之后取得居留权的签注, 如果在这之后被发现, 该人士已经持有了英国护照, 这个签注就会被取消. 而现在问题就来了, 那是不是06年12月21号以后, 取得永久居留签证ILR的人士,在取得了英国护照以后, 他们的ILR也会注销吗????虽然HOME OFFICE明确说明了在持有英国护照的前提条件下, 任何人如果在另外一个国籍的护照上签有的certificate of entitlement to right of abode'会被取消, 但是却没有提及如果是永久居留ILR是不是也会同样地被注销?? 但在另外一个方面, 有一些微小的细节值得关注, 英国有一种叫做NTLTOC的签证类别, 指的是, 一个人如果现在的护照过期了, 但在这本护照上的签证还有效, 可以通过申请这个NTLTOC把依旧有效的签证移到新护照上. 我的疑惑就来自NTLTOC申请表格上的一段话,
If you have become naturalised as a British citizen since
being granted indefinite leave to enter or remain in the
UK, you should not apply for a no time limit stamp in the
passport of your other nationality, as you have the right
of abode in the UK and are no longer subject to immigration
control. If you have retained your other nationality
and want your status confirmed in that passport or travel
document, and you do not hold a UK passport or identity
card describing you as a British citizen, you may
apply for a certificate of entitlement to the right of abode
in the UK.
这段话的意思是说, 如果你已经加入了英国籍, 将来你换护照的时候, 你就不能再申请更新ILR,因为你已经有了英国居留权, 这样你只能申请居留权签注Right of abode,但是我们在前面已经说过, 这个签注是给没有英国护照的人士的, 如果你已经有了英国护照, 你也不能申请这个了,如此一来问题就产生了, 如果在加入了英国籍以后, HOME OFFICE把你原来的ILR注销, 那保留两本护照的可能性也就没有了. 因为你的中国护照上没有了有效的他国签证了, 但现在的问题是, HOME OFFICE的网页上只涉及了RIGHT OF ABODE的取消, 却完全没有提到ILR的问题, 那么到底这个永久居留签证会不会随着你的入籍而被取消呢?????有哪位朋友是在06年12月21号以后申请入籍和护照的呢?请来分享一下你的经验. 叙述较繁琐, 请各位见谅, 但是问题确实复杂, 不得不详细叙述.
Powered by ScribeFire.
python arguments
What if you want to supply arguments to the Python script? The sys module contains a variable called argv. It is an array that contains the name of the Python file and any command line arguments that followed.
For example, let's define a file called show_args.py;
import sys
print sys.argv
Now when we evaluate show_args.py with Python, we'll simply see the arguments we entered on the command line, along with the filename of the script:
% python show_args.py 1 2 3 4 5
['show_args.py', '1', '2', '3', '4', '5']
%
Notice that sys.argv is an array, so you can refer to individual commands using the [] array element syntax. You can also use any array function on sys.argv or on a part of it (using the [:] syntax).
Here's file show_args_2.py that extracts elements from the sys.argv array:
import sys, string
print 'The arguments of %s are "%s"' % \
(sys.argv[0], string.join(sys.argv[1:]))
(The "\" character lets me continue the print command to the next line by nullifying the "newline" character that would otherwise create a new line.) We'll run this script with the same command-line arguments we used for show_args.py:
% python show_args_2.py 1 2 3 4 5
The arguments of show_args_2.py are "1 2 3 4 5"
%
The sys.argv array consists of strings, so you will need to convert number arguments to numbers using the conversion functions int or float. For example, let's make our pi multiplying script take an argument. We'll call it pi_mult.py:
import math, sys
def times_pi(value):
return math.pi * value
value = float(sys.argv[1])
print '%g times pi is %g' % (value, times_pi(value))
Now when we run it with a command-line argument, that argument is changed into a float before it is multiplied by math.pi:
% python pi_mult.py 2
2 times pi is 6.28319
%
But what if we forget to enter an argument on the command line? We'll get an error message (since there is no second element to the sys.argv array) and Python will stop evaluating the script file:
% python pi_mult.py
Traceback (most recent call last):
File ``pi_mult.py'', line 6, in ?
value = float(sys.argv[1])
IndexError: list index out of range
%
By convention, Unix commands will provide a ``usage'' message if the arguments are wrong. The usage message lists descriptions of the arguments (enclosed in "<" and ">" characters) so you know what kind of arguments the command requires. We can add a check for the right number of arguments to our command, and print out the usage message if the argument count is incorrect.
We'll make a new version, called pi_mult_2.py, in which we add the argument check and the usage message:
import math, sys
if len(sys.argv) != 2:
print 'Usage: pi_mult_2.py
sys.exit(1)
def times_pi(value):
return math.pi * value
value = float(sys.argv[1])
print '%g times pi is %g' % (value, times_pi(value))
Now when we try to run pi_mult_2.py without arguments, the number of command line arguments is wrong; it should be 2: one for the script filename and one for the number to be multipled by pi. The usage message will be printed instead of causing a Python error:
% python pi_mult_2.py
Usage: pi_mult_2.py
%
Thursday, 17 January 2008
python read files
Doing it the usual way
The standard idiom consists of a an ‘endless’ while loop, in which we repeatedly call the file’s readline method. Here’s an example:
# File: readline-example-1.py
file = open("sample.txt")
while 1:
line = file.readline()
if not line:
break
pass # do something
This snippet reads the file line by line. If readline reaches the end of the file, it returns an empty string. Otherwise, it returns the line of text, including the trailing newline character.
On my test machine, using a 10 megabyte sample text file, this script reads about 32,000 lines per second.
Using the fileinput module
If you think the while loop is ugly, you can hide the readline call in a wrapper class. The standard fileinput module contains an input class which does exactly that.
# File: readline-example-2.py
import fileinput
for line in fileinput.input("sample.txt"):
pass
However, adding more layers of Python code doesn’t exactly help. For the same test setup, performance drops to 13,000 lines per second. That’s nearly two and half times slower!
Speeding up line reading
To speed things up, we obviously need to make sure we spend as little time on in Python code (running under the interpreter) as possible.
One way to do this is to tell the file object to read larger chunks of data. For example, if you have enough memory, you can slurp the entire file into memory, using the readlines method. Or you could even use the read method to read the entire file into a single memory block, and then use string.split to chop it up into individual lines.
However, if you’re processing really large files, it would be nice if you could limit the chunk size to something reasonable. For example, if you read a few thousand lines at a time, you probably won’t use up more than 100 kilobytes or so.
The following script uses a nested loop. The outer loop uses readlines to read about 100,000 bytes of text, and the inner loop processes those lines using a simple for-in loop:
# File: readline-example-3.py
file = open("sample.txt")
while 1:
lines = file.readlines(100000)
if not lines:
break
for line in lines:
pass # do something
Can this really be faster? You bet. With the same test data, we can now process 96,900 lines of text per second!
Or to put it another way, this solution is three times as fast as the standard solution, and over seven times faster than the fileinput version.
In Python 2.2 and later, you can loop over the file object itself. This works pretty much like readlines(N) under the covers, but looks much better:
# File: readline-example-5.py
file = open("sample.txt")
for line in file:
pass # do something
In Python 2.1, you have to use the xreadlines iterator factory instead:
# File: readline-example-4.py
file = open("sample.txt")
for line in file.xreadlines():
pass # do something
Copyright © 2000 Fredrik Lundh
Powered by ScribeFire.
Wednesday, 16 January 2008
google search tricks
1.thekeywords site:thewebsite
Things can be found just on the specific web site.
2.intitle:index of filename
If you want to find some mpeg files, then use "intitle:index of mpeg", google will return some index of mpeg files web address, some of them are just like ftp file lists.
Things can be found just on the specific web site.
2.intitle:index of filename
If you want to find some mpeg files, then use "intitle:index of mpeg", google will return some index of mpeg files web address, some of them are just like ftp file lists.
Powered by ScribeFire.
Monday, 14 January 2008
Python reads configuration file
The ConfigParser module in the standard library already does this:
import ConfigParser
cfg = ConfigParser.ConfigParser()
cfg.readfp(open('myconfig.ini'))
print cfg.get('system', 'database')
----
The configuration file consists of sections, led by a "[section]" header and followed by "name: value" entries, with continuations in the style of RFC 822; "name=value" is also accepted. Note that leading whitespace is removed from values. The optional values can contain format strings which refer to other values in the same section, or values in a special DEFAULT section. Additional defaults can be provided on initialization and retrieval. Lines beginning with "#" or ";" are ignored and may be used to provide comments.
For example:
[My Section]
foodir: %(dir)s/whatever
dir=frob
would resolve the "%(dir)s" to the value of "dir" ("frob" in this case). All reference expansions are done on demand.
Default values can be specified by passing them into the ConfigParser constructor as a dictionary. Additional defaults may be passed into the get() method which will override all others.
---------------------------
Python 本身没有数组这个说法, 有的就是list和tuple, list就具有其他语言中的数组特性.
至于list和tuple的区别,在于list可以在运行时修改内容和大小,tuple在首次创建和赋值后, 不可以再次修改内部的内容
不过python 有提供一个array模块,用于提供基本数字,字符类型的数组.用于容纳字符号,整型,浮点等基本类型.
import array
#建立一个整数数组,初始内容是1,2,3,4,5
array.array('l', [1, 2, 3, 4, 5])
这种模块主要用于二进制上的缓冲区,流的操作.
Python中Array的常用操作数组基本操作
1. 定义数组
>>> seq = [ “a” , “b” , 1 ]
[ “a” , “b” , 1 ]
2. 创建数组
>>> a = “what are you doing?”.split()
[’what’, ‘are’, ‘you’, ‘doing?’]
>>> a = [ x*2 for x in range(1,5) ]
[2, 4, 6, 8]
b = [ x for x in a if x >3 ]
[ 4, 6, 8]
-----------------------------------------------------------1. 数组操作
x代表数组中的元素,i代表位置
a) append(x) 把元素x添加到数组的尾部
b) insert(i,x) 把元素x 插入到位置i
c) remove(x) 删除第一个元素x
d) pop(i) 删除第i个元素,并返回这个元素。若调用pop()则删除最后一个元素
e) index(x) 返回数组中第一个值为x的位置。如果没有匹配的元素会抛出一个错误
f) count(x) 返回x在数组中出现的次数
g) sort() 对数组中的元素进行排序
h) reverse() 对数组中的元素用倒序排序
>>> a = [ x*2 for x in range(1,5) ]
[2, 4, 6, 8]
>>> del a[0]
[4, 6, 8]
>>> a = [ 1 , 2 ] + a
[1, 2, 4, 6, 8]
>>> a += [None]*2
[1, 2, 4, 6, 8, None, None]
>>> a.remove(1)
[2, 4, 6, 8, None, None]
>>> a.pop()
[2, 4, 6, 8, None,]
>>> a.append(100)
[2, 4, 6, 8, None, 100]
>>> a.insert(0,8)
[8, 2, 4, 6, 8, None, 100]
>>> a.count(8)
2
>>> a.index(2)
1
2. 遍历数组
>>> a = [ x*2 for x in range(1,5) ]
[2, 4, 6, 8]
>>> for x in a:
… print x
>>> for i, x in enumerate(a):
… print x
>>> b = [ x+100 for x in a]
>>> for i,j in zip(a,b):
… print i,j
array in python
Two types of array:
1. the array comes with Python.
import array
a=array.array('f',[1,2,3])
aa=a*2 # got array('f',[1.0,2.0,3.0,1.0,2.0,3.0])
print a #not suitable for numerical calculation,http://docs.python.org/lib/module-array.html
2.Numpy (third party modules, need to download from http://numpy.scipy.org
from numpy import *
b=array([1,2,3])
bb=b*2 # got array([2, 4, 6])
P.S.: the two types can exist simultaneously, but when they are calculated together, the 'array.array' will be converted to 'numpy.array' automatically.
>>> import numpy
>>> a=numpy.array([1,2,3])
>>> import array
>>> b=array.array('f',[0.1,0.1,0.1])
>>> print a
[1 2 3]
>>> print b
array('f', [0.10000000149011612, 0.10000000149011612, 0.10000000149011612])
>>> c=a+b
>>> print c
[ 1.1 2.1 3.1]
>>> a
array([1, 2, 3])
>>> b
array('f', [0.10000000149011612, 0.10000000149011612, 0.10000000149011612])
>>> c
array([ 1.1, 2.1, 3.1])
>>>
jython searchs python path (but numpy not works)
sys.path.append('path to search')
This directory(\Python25\Lib\site-packages) exists so that 3rd party packages can be installed here. Read the source for site.py for more details.
####
java -Dpython.path=
plot in python
Here are some examples of 'matplotlib', from http://matplotlib.sourceforge.net/tutorial.html
Here is about the simplest script you can use to create a figure with matplotlib
|

If you are new to python, the first question you are probably asking yourself about this plot is, "Why does the xaxis range from 0-3 and the yaxis from 1-4." The answer is that if you provide a single list or array to the plot command, matplotlib assumes it a vector of y-values, and automatically generates the x-values for you. Since python ranges start with 0, the default x vector has the same length as your y vector but starts with 0. Hence the x vector is [0,1,2,3]. Of course, if you don't want the default behavior, you can supply the x data explicitly, as in plot(x,y) where x and y are equal length vectors.
plot is a versatile command, and will take an arbitrary number of arguments. For example, to plot x versus y, you can issue the command
plot([1,2,3,4], [1,4,9,16])For every x, y pair of arguments, there is a optional third argument which is the format string that indicates the color and line type of the plot. The letters and symbols of the format string are from matlab, and you concatenate a color string with a line style string. The default format string is 'b-', which is a solid blue line (don't ask me, talk to The Mathworks). For example, to plot the above with red circles, you would issue
|

See the plot documentation for a complete list of line styles and format strings. The axis command in the example above takes a list of [xmin, xmax, ymin, ymax] and specifies the view port of the axes.
If matplotlib were limited to working with lists, it would be fairly useless for numeric processing. Generally, you will use numpy arrays. In fact, all sequences are converted to numpy arrays internally. The example below illustrates a plotting several lines with different format styles in one command using arrays.
|

python plot using specific xticks
from pylab import *
plot([1,2,3,4])
xlabel('x axis')
xticks( arange(5), ('Tom', 'Dick', 'Harry', 'Sally') )
show()
scientific usages using numpy,scipy,matplotlib,ipython
Plotting 2-D data (from http://linuxgazette.net/114/andreasen.html)
Example 1: Plotting x,y data
The first example illustrates plotting a 2-D dataset. The data to be plotted is included in the file tgdata.dat and represents weight loss (in wt. %) as a function of time. The plotting routine is in the file tgdata.py and the python code is listed below. Line numbers have been added for readability.
     1  from scipy import *
   2
   3  data=io.array_import.read_array('tgdata.dat')
   4  plotfile='tgdata.png'
   5
   6  gplt.plot(data[:,0],data[:,1],'title "Weight vs. time" with points')
   7  gplt.xtitle('Time [h]')
   8  gplt.ytitle('Hydrogen release [wt. %]')
   9  gplt.grid("off")
  10  gplt.output(plotfile,'png medium transparent picsize 600 400')
To run the code, download the tgdata.py.txt file, rename it to tgdata.py, and run it with python tgdata.py. Besides Python, you also need SciPy and gnuplot installed. Gnuplot version 4.0 was used throughout this article. The output of the program is a plot to screen as shown below. The plot is also saved to disk as tgdata.png per line 4 above.
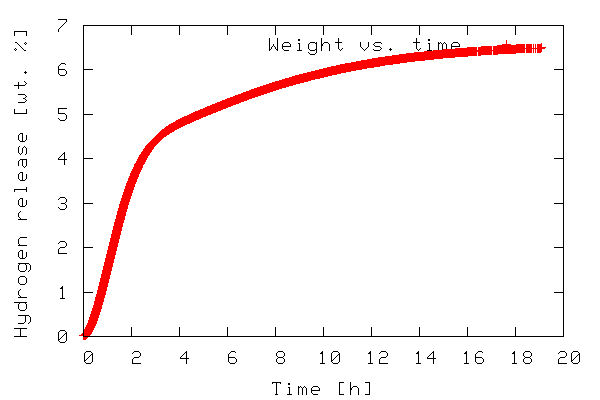
In line 1, everything from the SciPy module is imported. In order to make use of the various functions of a module, the module needs to be imported by adding an import module-name line to the the python script. In this case it might have been sufficient to import only the gplt package and the io.array_import package. In line 3 the io.array_import package is used to import the data file tgdata.dat into the variable called data as an array with the independent variable stored in column 0 (note that array indices start with 0 as in C unlike Fortran/Octave/Matlab where it starts at 1) and the dependent variable in column 1. In line 4 a variable containing the file name (a string) to which the plot should be stored. In line 6-10 the gplt package is used as an interface to drive gnuplot. Line 6 tells gnuplot to use column 0 as x-values and column 1 as y-values. The notation data[:,0] means: use/print all rows in column 0. On the other hand data[0,:] refers to all columns in the first row.
The gnuplot png option picsize can be a little tricky. The example shown above works when Gnuplot is built with libpng + zlib. If you have Gnuplot built with libgd the required syntax becomes size and the specified width and height should be comma separated.
###################################
The single import statement (from http://www.scipy.org/PyLab)
What most users want is for a single import statement to get a consistent set of packages which fulfil most of their needs. This should consist of:
from pylab import *
That gets them NumPy, SciPy, and Matplotlib. A rough equivalent would be:
Toggle line numbers
   1 from pylab import *
   2 from numpy import *
   3 from scipy import *
But there are so many names!
Not really. from scipy import * brings in about 20 subpackages (i.e. signal such that you still need to do signal.ifft, but not scipy.signal.ifft) and only 15 new symbols.tkinter conflicts with IDLE
The code you are told to write will invoke a Tkinter outer loop with root.mainloop(), and yet IDLE itself has already got an outer loop going. And creating two outer loops can keep you from closing Python (read further for solutions).
1.
To summarize, the bottom line is literally this: When using a root.mainloop() as your program's last command, be ready to "comment it out" (put a # number/pound sign at that line's beginning) when running from IDLE, and to undo the commenting when booting it outside of IDLE, such as from Windows Explorer.
root.mainloop() #ready to boot directly
# root.mainloop() #ready to run under IDLE
2.
A better solution: In examining newer Tkinter programming examples linked to these pages, including the revised tkex1.py above, you will find a usingIDLE Boolean variable that is set instead of commenting out the root.mainloop() command. This is cleaner and also handier, as it gets used in deciding other factors in how to destroy the top window upon closing, including whether or not the WM_DELETE_WINDOW protocol is employed.
Or:
>>> import sys
>>> for eachPath in sys.path:
if eachPath.find("idlelib"):
usingIDLE = 1
print 'find it'
>>> if usingIDLE:
# root.mainloop() # this means don't run the root.mainloop() for tkinter application.
Just to be clear, understand that this issue is in regard to Ctrl-F5/Running a Tkinter script from IDLE. If you boot a script from the OS or Python command line, or from Windows Explorer, then most of the time it doesn't seem to matter whether IDLE is also running.
This overall conflict situation appears to be also true with other Tkinter-based environments, such as the IDE that comes with Mac Python.
3.
Another solution: Don't use root.mainloop() at all, but instead use root.wait_frame(yourToplevelFrame). The first two example scripts on the Tkinter 3D page use this approach, as explained here.
Symbols computing in Python
Symbols computing in Python, ( from http://code.google.com/p/sympy)
In contrast to other Computer Algebra Systems, in SymPy you have to declare symbolic variables explicitly:
>>> from sympy import *
>>> x = Symbol('x')
>>> y = Symbol('y')
Then you can play with them:
>>> x+y+x-y
2*x
>>> (x+y)**2
(x+y)**2
>>> ((x+y)**2).expand()
2*x*y+x**2+y**2
>>> c=x**2-3*x+2 # 因式分解
>>> factor(c)
(1 - x)*(2 - x)
Python Tkinter runs without DOS box
Name the python file with the extension .pyw, while not py.
Windows users: if you click a .py Python program's filename in a Windows file explorer to start it (or launch it with os.system), a DOS console box automatically pops up to serve as the program's standard stream. If your program makes windows of its own, you can avoid this console pop-up window by naming your program's source-code file with a .pyw extension, not .py. The .pyw extension simply means a .py source file without a DOS pop-up on Windows.
One caveat: in the Python 1.5.2 release, .pyw files can only be run, not imported -- the .pyw is not recognized as a module name. If you want a program to both be run without a DOS console pop-up and be importable elsewhere, you need both .py and .pyw files; the .pyw may simply serve as top-level script logic that imports and calls the core logic in the .py. See Section 9.4 in Chapter 9, for an example.
Also note that because printed output goes to this DOS pop-up when a program is clicked, scripts that simply print text and exit will generate an odd "flash" -- the DOS console box pops up, output is printed into it, and the pop-up goes immediately away (not the most user-friendly of features!). To keep the DOS pop-up box around so you can read printed output, simply add a raw_input( ) call at the bottom of your script to pause for an Enter key press before exiting.
Evaluate Python speed (datetime->timedelta)
We can evaluate the following script with python and jython to work out which is faster.
import datetime
t1= datetime.datetime.now()
j=0
k=100000
for i in range(1,k):
j=j+i
print # to print a new line
t2= datetime.datetime.now()
tstr=[(t2-t1).seconds,(t2-t1).microseconds] # the attributes of timedelta class: senconds and microseconds, from http://docs.python.org/lib/datetime-timedelta.html#l2h-602
print 'Accumulated from 1-',k,': ',j
print tstr
Python and Matlab call system or executable programs
1.Python
command: os.system('notepad')
2. Matlab
command:
winopen('');
system('');
unix('');
sort within Python
1.
a=[15,13,17,11]
b=list(a)
b.sort()
c=list(b)
for i in range(len(b)):
c[i]=a.index(b[i])
print c
-> [3, 1, 0, 2]
2.
a=[15,13,17,11]
c=list( [ a[i],i ] for i in range (len(a)) )
c.sort()
c
-> [[11, 3], [13, 1], [15, 0], [17, 2]]
floating point format in Python
a=[0.001,0.003,0.002]
a.sort()
print a
-> [0.001, 0.002, 0.0030000000000000001]
import fpformat
b=fpformat.fix(a[2],6)
print b
-> 0.003000
b=fpformat.sci(a[2],2)
print b
-> 3.00e-003
Subscribe to:
Posts (Atom)
